
Once upon a time, there was a girl named Becky. She liked to make things and especially paint things, but most of the time she just used different tricks she learned from other people. This was great, but then one day she came up with an idea all her own. And it. Was. Epic.

I am sooooo excited to share this with you. For those of you who have been hanging out with me for a long time, you might remember the terrible failed Long Black Library Table incident? Yes, and how I then tried to explain the correct way of doing it, but without any examples to go with? Well, today that wrong will be made right, because I did it! I really did it and it worked!! Not only did it work, it was easy, fun, and magical! What more could a girl ask for?
A puppy.
Ahem. Okay, so I have a wonderful friend "K" who had a birthday last month, and I wanted to make her something special. I haven't done much for birthdays and holidays for my besties lately-of whom "K" is one- and I'm trying to get back in the swing of things. So for inspiration and to see what she likes, where did I turn? Where else but Pinterest! "K" is on Pinterest, so I stalked her boards and these were three useful pictures I found:
 |
| Via The Swenglish Home |
 |
| Via Addicted 2 Decorating |
 |
| Via Design Seeds |
Hmmm...I also knew that she loves growing herbs...or at least that she likes the idea of it. So I set out to make a worn turquoise wood planter box of epic proportions. Well, pretty much normal proportions actually. I used a 14" mud pan (for drywall mud) from Menards to act as a liner--so the wood wouldn't rot from all that watering.
This post is about how I painted said planter box--to see how I built the planter, check out my post Building a Wood Planter Box.
This post is about how I painted said planter box--to see how I built the planter, check out my post Building a Wood Planter Box.
Here is the planter, all built and ready for some paint

And here is how to make her a princess!
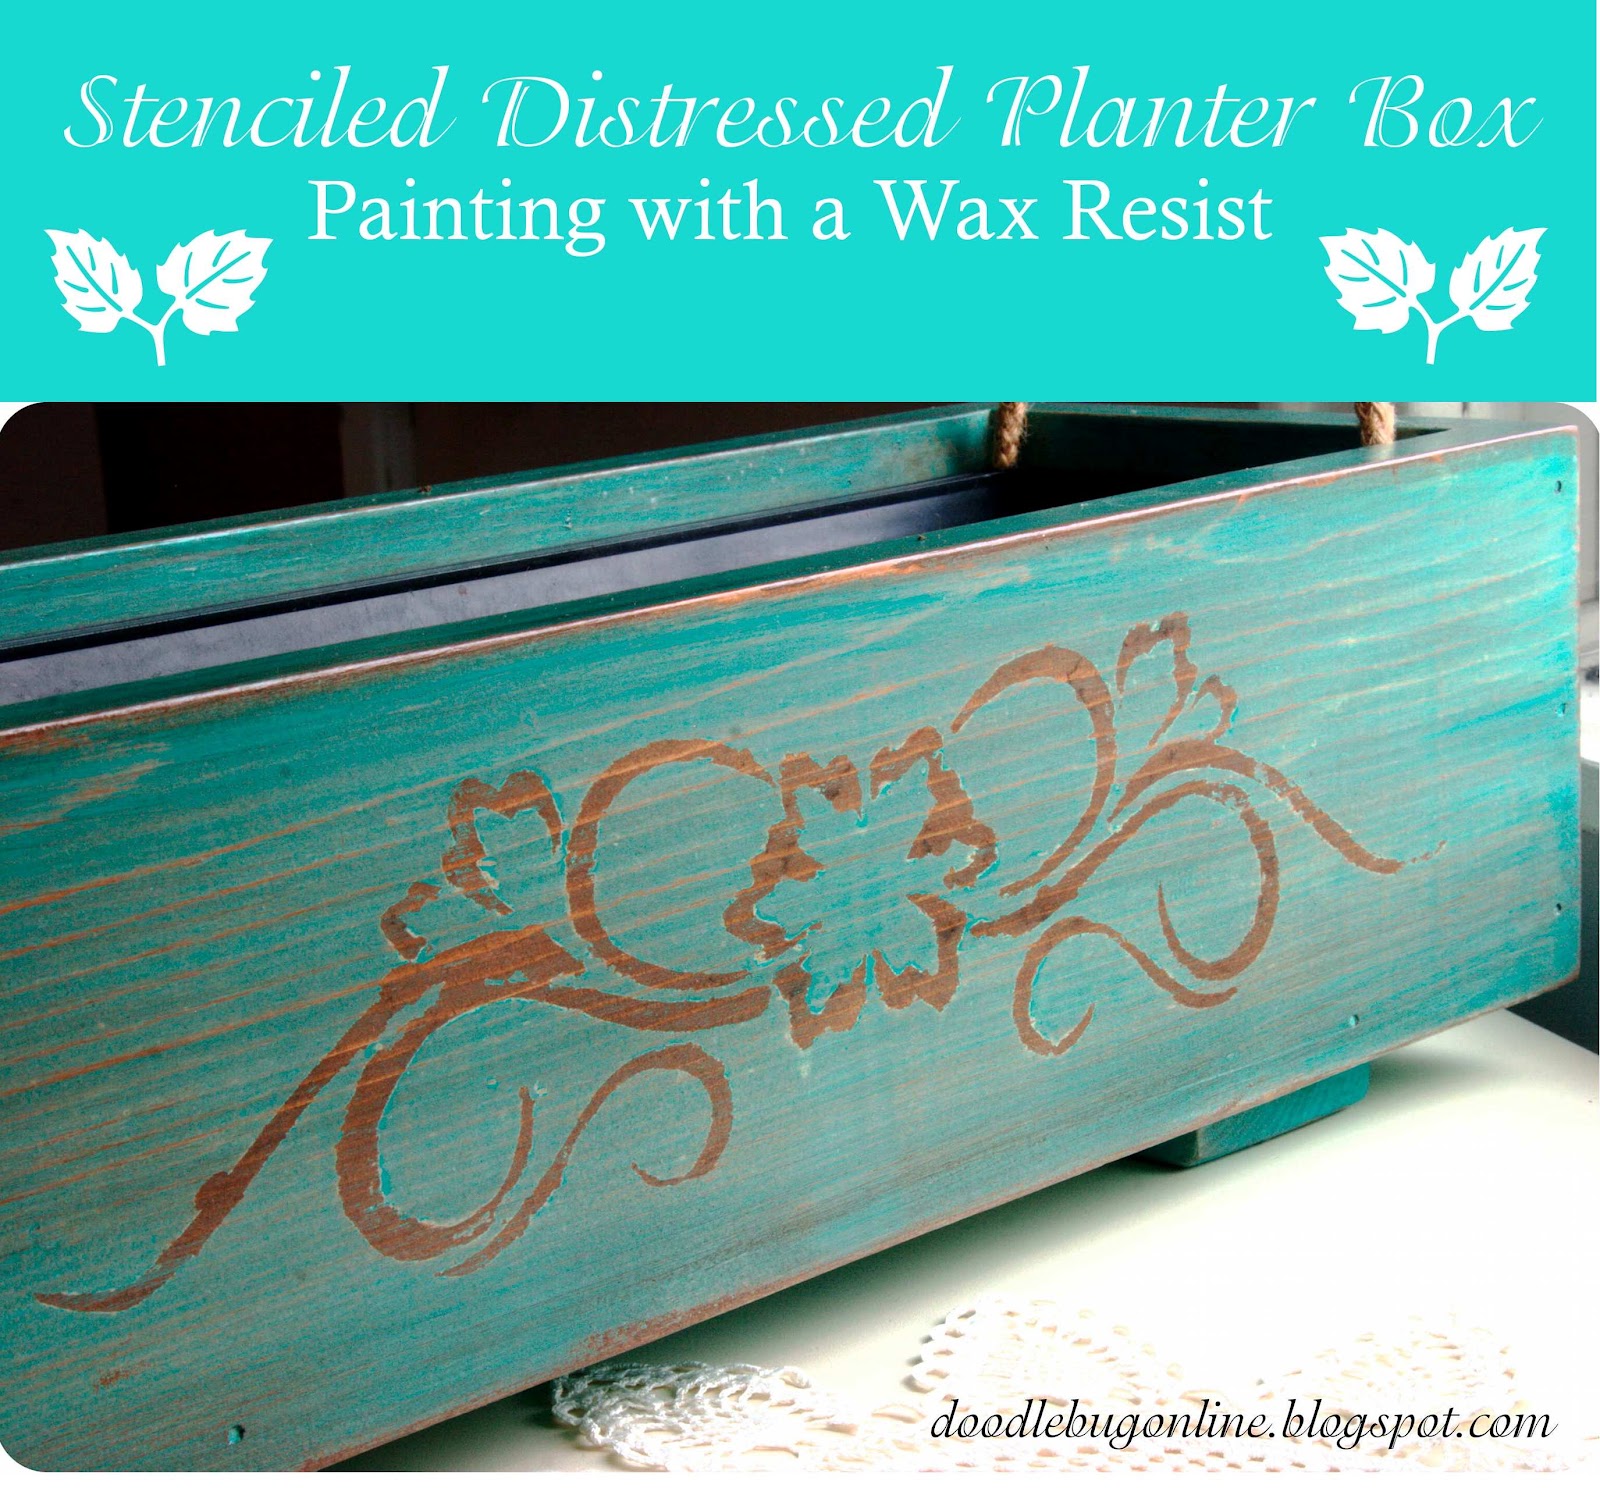

First, paint the whole box with whatever color you want the stenciled area to be. I chose to do a natural brown but I wanted the grain to show through, so I used watered-down latex paint.

Next tape on your stencil. I used a stencil I found awhile back that I printed on thick paper and cut out with my Exacto knife.

Using a tea candle, I heated the tea candle in the flame of a lit candle, then rubbed the softened wax into the stencil openings. Afterward I realized you could also use a long tapered candle--that would keep your fingers from getting burned :)


Peel off your stencil, make sure there's wax everywhere you don't want the paint to stick.

Are you starting to get the vision? Don't jump off the boat yet, because the next steps are important. Trust me, I did it wrong a few times before I got it right!

Since I would be distressing this piece, I wanted a third color besides the base coat and the top coat. So I opted for a thin coat of white paint since it would contrast well with the turquoise.

Then I painted the whole thing a really bright turquoise--again, watered-down.
**Though I have used full-thickness paint before, the only way I can be sure that this will work well is if I water down my paint a bit. Really thick paint, (especially high-gloss), can get rubbery and peel up so if you want to use full-thickness, I would test it first on a scrap.

THIS STEP IS CRUCIAL!! In order for you to get the wax off without peeling off your paint, you must sand off the layers of paint on top of the wax. Otherwise when you get to the next step, it will all just bubble up and peel off. And that is NO FUN! That's what happened to me on the Long Black Library Table. It makes it look sloppy and you can't get all the wax off properly to seal it.

I was going for the distressed look, so I sanded the corners down to the bare wood.

This is the magic step. Take your iron and an old towel or piece of absorbent fabric (I used an old T-shirt scrap). Iron on top of your wax stencil until the wax melts into the fabric.

The paint will peel up onto your towel in spots. For the spots that don't come up right away, when the paint is still warm from the iron take a piece of sand paper and gently sand in the direction of the grain. The warm wax underneath the paint will make the paint come right up. Sand and iron away until you get all the wax up.

Once I had the wax off, I wanted my sanded corners and other areas with bare wood to be darker. I took the first brown wash and gave it a light wipe-down. This is similar to using stain to distress a dresser, like the Distressed Antique Dresser: Paint + Stain.

Once I had it sufficiently sanded, distressed, and "washed," I sealed it up with Minwax Polycrylic. I gave it two coats on the outside, three on the inside. Here's a full list of what you'll need, start to finish. Basic stuff, really.
Supply List for a Wax Resist
1. Whatever you want the stencil to be on.
2. Base coat of water-based paint (can be full strength or watered down)
3. Lit candle & Candle for wax
4. A stencil (paper or plastic--just sturdy)
5. Topcoat of water-based paint, thinned a bit
6. Sandpaper
(Optional: Watered-down paint to soak into areas of bare wood)
7. Iron & Old Towel
8. Sealer--I recommend Minwax Polycrylic

There you have it! Now go and stencil something!!

You could use this on an old silverware box, a dresser top, a bookshelf, a wall plaque, anything! If you use it, I would love if you would send me a picture or link so I can see your creative genius!


"K" told me she loved her present, and that makes me one perfectly happy girl.
Happy Tuesday!
~The Doodle Bug
I'm usually partyin' at these hangouts:
Friday Feature @ Redoux
Feathered Nest Friday @ French Country Cottage
Furniture Feature Friday @ Miss Mustard Seed
Show & Tell Friday @ My Romantic Home
Flaunt it Friday @ Chic on a Shoestring Decorating
Frugal Friday @ The Shabby Nest
Simply Creations Link Party @ Simple Home. Life
It's a Hodgepodge Friday @ It's a Hodgepodge Life
Spotlight Saturday @ Classy Clutter
Trash 2 Treasure Tuesday @ Kammy's Korner


Wow great idea and it turned out so pretty! I know your friend is going to love her gift.
ReplyDeleteI love this!! I wish one of my friends would make me a gift like this! ;)
ReplyDeleteI have the most creative daughter ever!! And I am very proud of her.
ReplyDeleteVery nice! Thanks for the tips!
ReplyDeleteWhat a wonderful flowers container, very good job, I love the turquoise color, and the tutorial is very helfpul, you showed up in complete way. Thank you.
ReplyDeleteHi, Becky
ReplyDeleteThis is just a great piece. I love the colors you picked and its detailed, but the afterward is awesome! I am for sure going to try this out. i found your lovely blog on My simple home life link party. I love looking around and I am a new follower. I would love for you to stop by www.homesweetbutterfly.com. Have a great weekend.
Vanessa
How cute is that! You are one clever doodle bug! I really love when failed projects lead us to something greater...
ReplyDeleteThis is so cute!!! Thank you so much for sharing, and the great tutorial too! Be sure to stop by tomorrow at my party to check up on your project!
ReplyDeleteI think this is awesome! I cannot wait to try it...I always love trying new techniques! Beautiful project!
ReplyDeleteHi,
ReplyDeleteGreat post! Very clear instructions that make complete sense! Being able to write a tutorial is a great skill and you've got it down to a fine art!
I have a question re the stencil. Some of the design on your stencil is very thin, how do you sand the paint off the wax without taking off the surrounding paint so the ironing can take place?
Thanks for your time,
Cathy
Hello Cathy!
DeleteGreat question. I was going for a distressed look on this planter, so the sanding to get the paint off of the wax was part of the distressing for this project. If you want a piece not to be distressed, there are a few ways to go about it. You could either a) sand VERY carefully and only hit the raised parts where the wax is, or b) use a scraper or something much more detailed (a toothpick, etc...) to carefully wear away the paint on top of the wax. The best way I've found, though, is to sand lightly and scrape up the paint around it as little as possible, then put a sealer on top, which will make the scratch marks in the paint magically disappear. Just use a high grit sandpaper--220 or so. Hope that helps!
Muy buen trabajo, es como el batik pero en madera. Genial!
ReplyDeleteThis comment has been removed by a blog administrator.
ReplyDeleteWhich paint do u use??
ReplyDeleteI am new to this and I don't know what to ask at shop ? I don't know what kind of paint is used on wood? This is same as what we paint on wall?
Hi Jivisha!
DeleteHere is a post about paint that might be helpful:
http://doodlebugonline.blogspot.com/2012/10/paint-mixing-basics.html
A short answer would be that I usually use interior latex paint. So yes, the same that you paint on the walls inside your house. Good luck!