Showing posts with label storage. Show all posts

Friday, August 31, 2012

Garage Shelving Destruction

Welcome to what has been dubbed our

"Summer of Destruction."

We love our new home...but there are definitely things that HAVE to go.

One word:  Thistles.
Eek.

But more on that another day.
For today, we have the destruction of some garage shelving!  I know, I know, perhaps too exciting for a mere blog post.  But we will press on together.

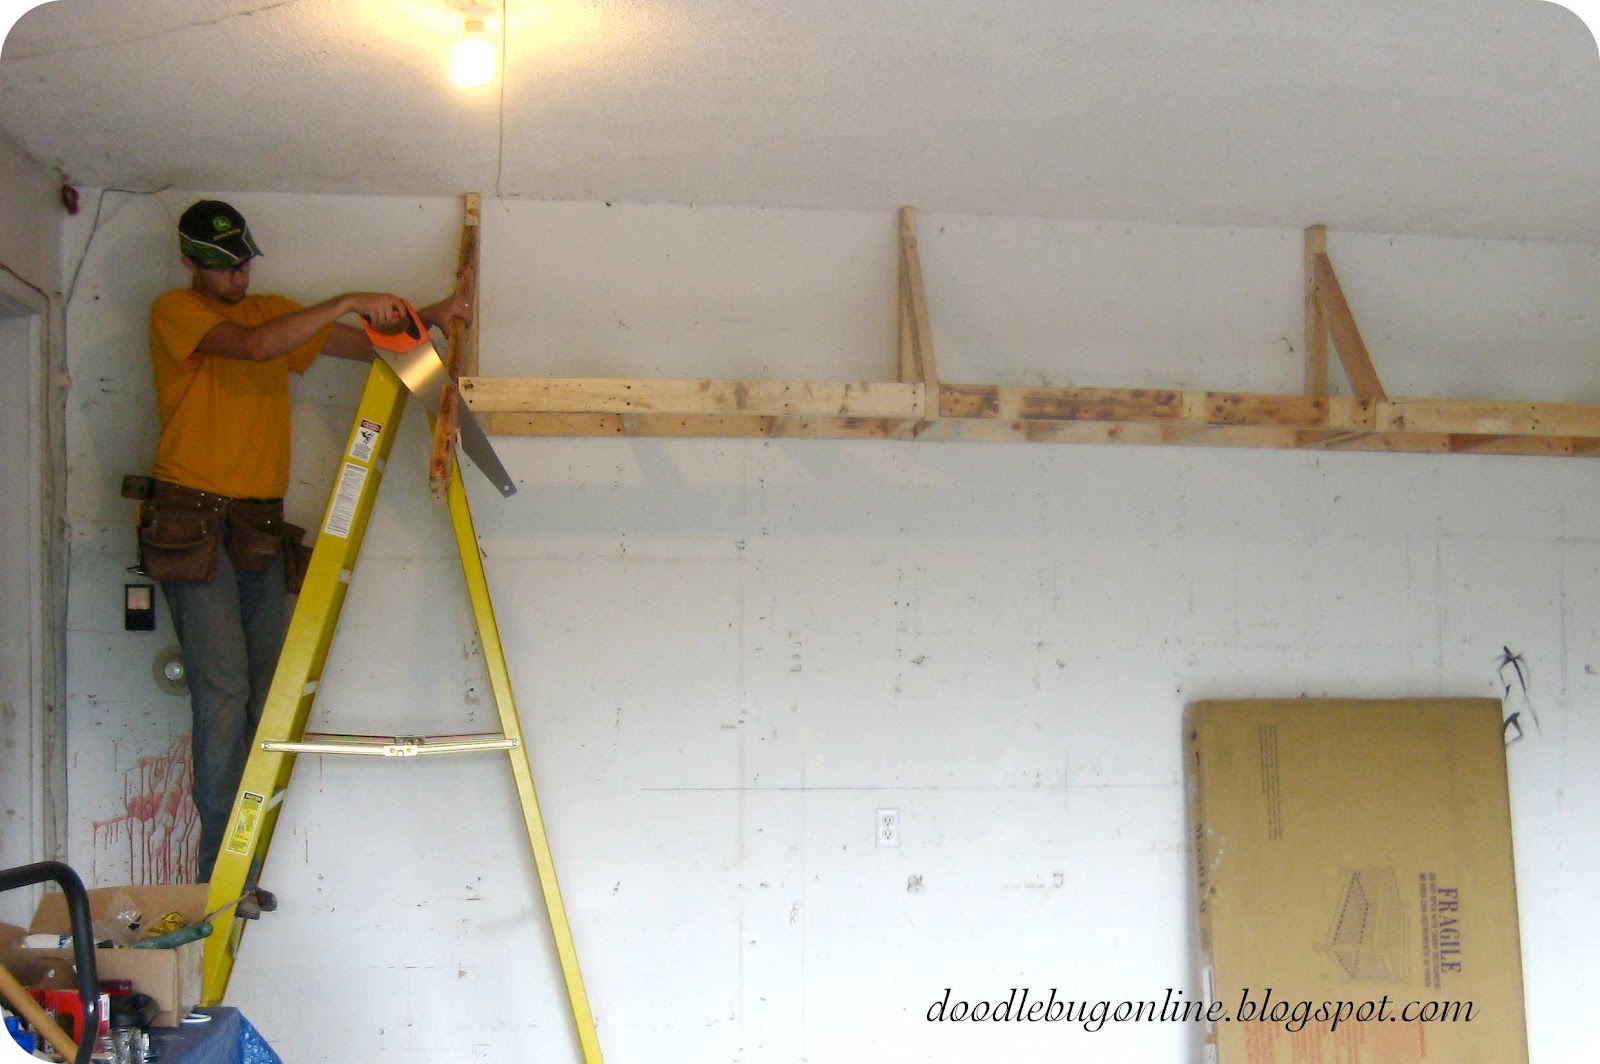
Meet our old shelving:
This is actually an "almost" before shot, because I was distracted by my hunk of a husband pounding away and didn't think to capture the moment on my camera until later.  Can you blame me?

There used to be pegboard along the wall of the center section, and another two shelves above the center shelf.

Now you might be saying,
 "Hey, I'd give my left two lug nuts for some nice, sturdy shelves like 'at!"

 And I would respond to you by saying,

"Yes, but whoever built these nice, sturdy shelves did NOT have to fit a car and a full-size truck into this subdivision-size garage."

And I would win.  Because I always win on my blog.
SO.  We decided to get rid of them and reuse the lumber to build a nice, sturdy shelf high in the garage that wouldn't be in the way or give us concussions as we squeeze by the truck.

Joe started hammering.  Because whoever built these suckers meant for them to live through a nuclear blast and act as food storage for the proceeding nuclear winter...well, that or he just really liked his nail gun.
 Seriously, Nail-Gun Guy?  You need NINE NAILS to get this board attached?  NINE????
 Let's just say that Joe was sore for a few days after all this.

Joe finally got it all down after a little sweat, maybe blood.  We won't talk about the tears.
Just kidding.

And then the hubster started putting up the NEW shelving!  Beginning with these "studs" (2x4's) attached with Lag bolts.  Kudos to Joe for getting all the materials for this shelf from the old pieces he took down.  I don't know if I would have had the patience (NINE nails, people).
 Then he built essentially a miniature "Wall" to form the shelf (built on 16" centers for the geeky people out there), attached them with lag bolts, then added on cantilevers (those angle pieces, for the normal-y people out there).  Then he cut the plywood to size and BAM!  NEW SHELVES!!!!
 We're pretty excited to get both our vehicles in the garage.  Because let's face it--if you get hail damage on your truck because you had it sitting right outside your perfectly useable garage...it's probably your own darn fault.  So now we can put our garage to its proper use!

Oh, and for those of you who want see something pretty,  here is some masculine decorating for you.  Joe had brought these signs home from work--they're products/brands that his company owns & sells.  And I gotta tell you, they're kinda cool :)
I told Joe I think we should get royalties for putting those signs up.  Because our retiree neighbors are often buying bags of soybean seed...
And now we have a home for my gardening supplies, our miscellaneous gas/oil/car stuff, our sprayer, cooler, fishing and grilling stuff.  Oh yeah, and a home for the car and truck :)

It's good to be home.

Oh, and sorry Nail-Gun Guy, but this time we used screws.

Enjoy your Labor Day weekend everyone!  We're going to see some family and friends, hang out and probably drink some lemonade.  Sounds like a good weekend to me.

~The Doodle Bug

Tuesday, August 7, 2012

Mid-Century Sideboard & BIG NEWS!!

Are y'all ready for this?

I don't think you are.
Picking strawberries in June
Those of you who are lucky enough to know me in person (ha ha, I'm such a snot) will already have figured out why I have been MIA on my blog for about the past three months.  Three.  Months.

But don't think I haven't thought about you, my dear readers.  I have thought about how many times people might have checked in to see what's going on, and been slapped in the eyeballs with the
same. post. over and over again.  My apologies.  Here is my list of excuses (not the picture, I'm just trying to send some pictures your way to catch you up):
My birthday "cake" in May
1.  Joe and I have been trying to buy a house for...well, just under a year now.  AND WE FINALLY DID!!!  But the closing process was very drawn out and such, so I was a little preoccupied with packing...then waiting two weeks and unpacking things as I needed them...then repacking them.
But we did close on a house that we love about three weeks ago, and have been painting, spackling, moving, buying stuff, installing, uninstalling, and many other very exciting things ever since then.
Our new house!  Ignore weeds...
Why, though, have I been gone so long?!!

ANNOUNCEMENT OF THE CENTURY:
We're gonna have a baby!!!
Yes, yes, please swoon and scream.  It's completely called for :)
Joe and I are sooooooo excited.  Our little bundle is due January 26, so there will soon be some nursery posts and such, along with pictures of our house as we finish up some projects.

No, we don't know if it's a boy or girl, you can all take bets and give me your winnings :)
Oh, and here's our little Jip now, all growed up.  *sniff*

And for a little taste of our new house, here is a project that I actually finished up about two months ago, but have been waiting to get into our new living room.

Introducing:  The Mid-Century Sideboard
 Uck.  I bought it for $15 bucks at a garage sale--and I realized a little later that it was solid oak.  Yessss...because veneer is just not my favorite.

Here are a few inspirational shots that I used to figure out what to do:
I knew I wanted wood + white.  The question was, do I want wood outside and white inside, or the other way around?  Wood drawers is by far the more popular choice...but then you're left with a scratch-me-with-anything white top, and I am simply not careful enough for something like that.  Also, this sideboard has curvy drawers, so sanding would have been a nightmare.

White drawers won.
 Nice oak, huh?
That concludes my process shots.  Because I got excited...or lazy.  Not really sure.
Blame it on baby-brain.  I blame everything on that now, it's awesome.

But here's the process in a nutshell:  Sanded with orbital and hand-sanding; Sealed natural wood with Minwax Polycrylic--2 coats on the side, 3 on the top);  Taped off the places that I wanted to remain wood but would be painting next to; Primed painted areas with Zinsser FastPrime2; Second coat of primer;  Two coats of a white, semi-gloss paint (actually my paint was flat, so I mixed in some Gloss Polycrylic...worked great!).

After all that, and letting it sit covered up in our basement for a couple months, here she is!!
See my other treasures?  This was really fun to fiddle with.  Left to right:
1.  Bamboo I bought awhile back that has fallen over on many people.
2.  My beloved record player.  You can read all about it here!
3.  Antique Fan that I found at a sketchy secondhand store in St. Paul for $5.  Joe rewired it :)

And now I know what you're asking.  "Where in the world did you get that beautiful picture???!"
    Well, actually it's an original photograph taken by the famous Cheryl Lancaster.
Otherwise known as MY MOM!!!  Isn't she AWESOME??!!!
This is one of my favorite pictures of hers, and I was always talking about it.  So she got it printed on canvas and asked if I might like to have it.  Uh, yes, please.

If you want to follow her photography, she posts her new shots on her blog, cherylshootsphotography.  Check her out and show her some love.  I believe many of her shots are for sale, as well...in case you have crazy picture jealousy ;)  Just contact her through her blog.

In case you forgot how NOT awesome this thing was before, here is a reminder:
Ahhh, the color palette and accesories make me feel so happy right now.  I've been waiting and waiting, and it's really starting to feel like home.

Now just to have a little one screaming upstairs...

~The Doodle Bug


I'm usually partyin' at these hangouts:

Friday Feature @ Redoux
Feathered Nest Friday @ French Country Cottage
Furniture Feature Friday @ Miss Mustard Seed
Show & Tell Friday @ My Romantic Home
Flaunt it Friday @ Chic on a Shoestring Decorating
Frugal Friday @ The Shabby Nest
Simply Creations Link Party @ Simple Home. Life
It's a Hodgepodge Friday @ It's a Hodgepodge Life
Spotlight Saturday @ Classy Clutter
Trash 2 Treasure Tuesday @ Kammy's Korner
DIY Club


Thursday, May 24, 2012

Grey Highboy Dresser

Hello, Mr. Woodchuck.
Haven't seen you around in awhile, huh?

Do you remember how last Spring I was so excited to move to our current rental and see all the wildlife?  Yes, and how I was so excited about the woodchuck I saw by our shed?

Well, then we learned that they're varmints and that they tunnel under buildings, compromising the foundation.  So...then Joe got out his gun.  A big gun.  
On Sunday morning.

No more Woodchuck.

Until this evening, that is.  Now my husband will have something else to take care of.  And then we will all mourn the woodchuck.  *sniffle.*


Anyway, now that I have offended all the varmint lovers out there, let's get to the point of this post--starting with the before AND after!  (hey, you've already read this far, you deserve it).

Thursday, March 8, 2012

Driftwood-Look Table & Chairs

Well, today has been a good day.  I have pieced together & fixed, painted, and upholstered four dining chairs, and then made a cutie little hanger out of some of the scraps!  You'll get to see that soon, but for today I have a big project that took me a good week and a half to complete.  And it was worth every minute.

Here she is.  My first dining table project, with chairs to boot!

Monday, February 27, 2012

Trimming Out a Bookcase

Monday, Monday.  So good to me...today.

I am feeling pretty on top of things today.  I have gotten ready for the day, eaten breakfast, sanded four chairs, and spray painted five chairs and a sculpture.  And it's only 10:08!  Now I'm feeling like I have earned the right to take time to blog...so here I am, getting to talk to you lovely people!

First, let me say that there are a few little changes going on around here that I'm pretty pumped about.  I finally have buttons at the top of my sidebar so you can easily visit my Pinterest, Facebook, and Twitter pages.  Are you on Pinterest yet?  I love, love, love it.  A good friend sent me an invite last fall, and I have spent more time there than I care to admit.  Research, right?  Right.  I have all my pages set up to work together now, and will be posting new posts and updates through them, so keep up however is best for you!  You can also "Pin," "Tweet," or "Like" any post using the buttons at the bottom of each post.  Joe, my husband, is a computer guru--my computer guru--and he spent a couple precious hours of his Saturday helping me out.  I gave him lots of hugs.  Thanks, honey.

Also, let me throw out a quick "thank you" to the ladies over at Classy Clutter, who host their Saturday Spotlight linky party every week, and featured my Antique Distressed Dresser last week!  Thanks to everyone who visited, hope you found something useful :)

Alrighty, now on to the reason you came over here in the first place.  My sharp wit  bookcase!


Friday, February 17, 2012

Distressed Antique Dresser--Paint & Stain

**Welcome to all who are visiting from Pinterest!  I'm so happy you've stopped by,  hope you have some fun while you're here :)  If you're looking for some more projects, check out the tabs below the header.
________________

HELLO!!

I am so excited to show you all this project.  I have been wanting to post on it for about a week, but could never seem to find the time.  Today, however, my body decided to run a slight fever and hurt all over, so lucky for you today is the day of the long-awaited (by me) post!!

This project was a new process for me, and a great piece to start with so when it was done there was a lot of "Joe, look at my dresser!"  "Don't you love it?!!"  "I am SO excited!" etc...  And yes, Joe played along very well and was excited for me...though not as excited as me, I do believe.

Meet an antique quartersawn dresser that has seen many better days.

The dresser was structurally sound, but the veneer was peeling and wavy (probably water damage) and one of the drawers had split apart (note the wood putty).

SO after I did some gluing and wood putty to fill all the gaps, then sanded down the top and drawers, I was ready to get to painting.  I know that might make some of you cringe, but look at that top!  No way was that veneer coming back to life for a refinish job--paint was its only option.

I had been seeing in the store a combination of Paint + Stain, and was loving the results, so I thought this was a great piece to try it on.  Meet my Arsenal of products:
First, let me tell you that I am not a lover of prep-work.  In fact, if ever possible I skip it (Don't tell anyone, the primer police might come and get me).  In this case, though, the wood was very raw, not glossy, so I simply tinted my primer to my desired base coat.
And did it work well?
Absolutely.
That's a point for me.
(If you want more tips and cheats on painting, check out my post on Paint Mixing Basics.  It might just change your life)

I started with my Zinsser FastPrime2, which is white, and tinted it with the Royal black paint, and some blue craft paint (did I just say craft paint?  Why yes, madame, I did.  I really don't need a quart or gallon of bright blue or bright yellow, so I use cheapo craft paints to fine-tune my colors!  Call me a genius, I'll pretend to be modest).  I tinted it to a bluish medium grey, which is a color that I'm currently in love with.  That is the color in the cottage cheese container.

The other product is a Minwax Dark Walnut oil-based stain, and sandpaper.  I also used Minwax Polycrylic water-based poly, it just didn't want to be in the picture.

Okay, so here are the steps (apology for the missing pictures...I was excited...)

1.  Patch, sand down, glue, etc... the whole piece.
2.  Base coat in your concoction of tinted primer (in my case, grey).
3.  FOR A DISTRESSED PIECE:  Once the base coat is dry, use orbital sander or sanding block to sand away the paint on corners & high-wear areas (remember the drawer fronts, too!).  Sand down to the raw wood--this will become magic in the next step. (for tips on a convincing aged look, check out the post on Aging Furniture)
4.  Wipe on stain with paper towel (wearing solvent-resistant gloves & the ever-popular respirator) all over the piece, in the direction of the wood.
Here is what to notice:  
See the base-coat blue-grey in the drawer slots?  That is before any stain.  The top is after stain is applied.  Magic, right??  I actually had no idea that the stain would turn the piece into a greenish color, but I love it.  Also notice the edges that were sanded down.  Since they were raw wood, the wood accepts the dark stain and makes those distressed areas pop out.  Wood lovers, that part's for you.

5.  After the stain has set for a little while, take a clean paper towel (keep those gloves & respirator on) and wipe off any excess in the direction of the grain.  If you wipe too much off in one area, just reapply some stain evenly and try again.  This part is fairly forgiving.  Make sure to leave the stain in the cracks, since that is where a piece will age naturally.

6.  Let the stain dry 24 hours and sealcoat it with Minwax Polycrylic Water-Based Polyurethane. 

Not too complicated, right??  And it can take a sad dresser like this:
And turn it into THIS!What's missing, you ask?  Can you tell me?  Drawer hardware, of course!!  (As far as I'm concerned, hardware is jewelry for furniture...and I could spend an unjustifiable amount of time and money on it.  I actually splurged a little on this piece and spend $1.77 each on them.  Be still, my heart).Here she is in the store.
 Who Doesn't want a giant ceramic pear?  That's what I would like to know.  And please admire the insanely heavy cast-iron tape dispenser.  I'm kind of happy no one's bought it yet...
Ooh, though I am not obsessed overall with the distressed furniture movement, I am really loving this treatment.  The stain makes it seem so much more natural--and I can still see some of the wood's color underneath.  
Not to mention those knobs  :)
I have since used this technique a few more times, and with a few different options.  Check out some ways to fiddle with this finish in these posts:
 Grey Highboy Dresser (Another example of this same technique)

Driftwood-Look Table & Chairs (Similar finish with only water-based products)

 Wax-Resist Stenciled Planter (To add a stenciled design to a distressed piece)

 White & Grey Distressed Table and Chairs (Similar finish with two tones of paint)


Happy Friday, have a great weekend!!

~The Doodle Bug


I'm usually partyin' at these hangouts:

Friday Feature @ Redoux
Feathered Nest Friday @ French Country Cottage
Furniture Feature Friday @ Miss Mustard Seed
Show & Tell Friday @ My Romantic Home
Flaunt it Friday @ Chic on a Shoestring Decorating
Frugal Friday @ The Shabby Nest
Simply Creations Link Party @ Simple Home. Life
It's a Hodgepodge Friday @ It's a Hodgepodge Life
Spotlight Saturday @ Classy Clutter
Trash 2 Treasure Tuesday @ Kammy's Korner


This post has been featured on Better After & Classy Clutter!  Thanks for all your visits & comments!


Monday, November 21, 2011

Vintage Suitcases

I never used to think that these old, vintage suitcases were anything but ordinary.  I remember every summer packing up my clothes into a hard orange-ish suitcase, excited for another week at summer camp.  It did not occur to me that the suitcase I used could perhaps find a new life sometime in the future.

But these old vintage suitcases have definitely been making a comeback--as anything but suitcases.

Here are a few examples:

(I will apologize in advance if the pictures do not show up.  I have been having some issues with pictures from other websites, even if I give them credit and link the picture.  Anyone know if that's normal?  Either way, I link the picture to the source, so if you want to see them and they're not here, you can click on the picture and see it!)

vsct_01.jpg
Coffee Table by Kate--featured on Design*Sponge

chair.jpg
Suitcase Bench by See Kate Sew
086.jpg
Suitcase Dresser by Junk in the Country
chic-on-cheap-pet-bed-step-by-step.html.jpg
Pet beds from Tip Junkie
How fun, huh?  
Well, I have had a few old suitcases in my possession for a couple years now.  I found them for only $2 each--$6 later, they were mine!  At the time, we were just moving, (literally, I bought them from the store that was next door to our new apartment the day I was moving in all our stuff), to an apartment that had TONS of charm...but no closets.  Actually, that's a theme in our lives.  We still have no closets...well, we do have a small linen closet, so I guess we're moving up in the world!  But in our last apartment, we did not have a linen closet, but we did have a lot of extra room in our bathroom.
This is the full portion of the bathroom, but there's a bunch of open floor space behind the camera.  I was trying to figure out where to put our towels and such when I remembered my suitcases.

And Voila!  A Towel Suitcase!  They fit right in with the colors of the brick, and though we have since moved, I still love how they looked.  
What ideas do you have for old suitcases?  

Happy Thanksgiving week!  I have been prepping for Christmas posts--so after Thanksgiving get ready to plug in your glue gun and get out your jingle bells!


http://homemade.tipjunkie.com/wp-content/homemade-thumbs/leggage-repurposed-into-a-pet-bed-drab-to-fab.jpg