Showing posts with label paint. Show all posts

Friday, January 4, 2013

Nursery Reveal!

I know, you thought it would never come.
But it has!
I've been working on the nursery for...a long time now.  Putting it together bit-by-bit since August.

People have been asking Joe at work what the theme is for the nursery.
Theme?
Uhhhh...

There's no theme.
My goal was to make a gender-neutral nursery (we don't know what we're having), and since I didn't want to do yellow and green, I decided on a different route.  I decided to put feminine and masculine elements into the room and (hopefully) strike a balance between them.  You can judge for yourself how I did.  And if you don't like it, just lie and tell me you do, or I might break into a bout of hormonal crying :)

37 weeks this Sunday, by the way!

Here is how the room looked when we moved in.
Not bad...just boring, and like the rest of the house, "oaky" (check out the Kitchen & Dining Room Reveal if you want to see more).

I decided first that I would put a "lemongrass" color on the wall.  Awesome.
So I mixed up a sample, pretty excited to get started.
I tenderly painted the color on the wall, thinking fondly of our little munchkin-to-come.
...and then I just about bopped in my mouth.
I. Hated. It.
I'm going to be looking at enough baby poop in the coming months, I don't need the walls to be singing the same tune!
Okay, time to revamp.
So I headed to my computer to Pinterest (where else??) and my trusty Nursery board.  And I found a solution.
Phew!
I know, beige and white are a bit...boring?  But I like it.  Simple, and I could add whatever color I wanted in the rest of the room without worrying about clashing.

So that's the introduction, and here is the finished room!  I'll list out some items and details at the end.
SCREECH!!!
Hang on a second.  Where the heck did that INCREDIBLE blanket come from???
Oh, you know.  
My Mom made it.
SAY WHAT?  She Made it??  I knew she was knitting a blanket, and I picked out the colors, but I was pretty much envisioning a simple stripe or a basic chevron pattern.  Then at Christmas I open THIS.  I was completely blown away.  Thank you, Mom, for slaving away for six months +.  Baby is going to love it.
Yes, I am still in shock.
She made it.

So exciting!
Here are the dirty details:
Paint & Moldings:  We painted the walls, window and trim.  The trim around the top of the room is actually two different moldings, and we painted the wall between them white to give a bigger impact.  The top trim is a small crown, and the lower one is Picture Rail Molding.  I think we spent about $60 for both moldings.  We had to special order the Picture Rail, and I still need to order hooks to go on it.  It's a molding you can hang stuff from with special hangers they make (Google it, it's pretty snazzy).  And I think it makes the ceiling feel higher, which is nice.

Joe thinks it's funny that the only room in our house with crown molding is the Nursery.
Meh.

Okay, here's where I got a bunch of stuff.  I did a lot myself, many were gifts (recent and from the past) and some I bought from stores or other creative people.  

Crib:  A Beautiful and generous gift from my parents.  It's the DaVinci crib made by Kalani, in Espresso.
Mobile:  A gift from my Grandparents.
Embroidery Hoops with Fabric:  I bought the embroidery hoops at a thrift shop, painted them white, and put  in fabric that I had on hand.  $8.
Knitted Blanket:  A gorgeous gift from my awesome Mom.  Wow.
Crib Sheet:  Carter's Brown Plush (Velour) Easy-Fit Crib sheet.  Babies-R-Us.  $18.
Crib Skirt:  A gift from my Grandparents
Curtains:  I bought plain white grommeted panels at Target ($29.99) and bought a yard of the super cute Argyle fabric on Etsy ($9?).  I sewed a strip of the fabric onto the panels and voila!  Custom panels for under $40!
Metal Bucket O' Blankets:  I bought the bucket (with red handles! Eee!) at Now & Again.  ~$20?
Glider & Ottoman:  I bought it on Craigslist for $25, in desperate need of new foam and fabric (but the wood was already white.  Score).  I recovered it with fabric from Jo-Ann Fabrics and replaced almost all the foam.  Total came to about $60.
Red Changing Table:  I found this at one of the Occasional stores in town, This & That, for $50.  Already painted and everything!
Changing Pad Cover:  Mod Pod "Pop Monkey."  Babies-R-Us, $17.99
White Wall Shelves:  I bought these at Now & Again, and painted them white.  I used a little stamp for the green flourish and bought the hooks at Menards.  $19.
Rooster:  The rooster on the shelf was a gift from a dear friend.  
Large Wood Sign:  The piece of wood was a tabletop that I really loved...and couldn't let go of (look at the grain, I know you wouldn't let it go either).  So I found a new purpose for it!  We took it off the table frame (it was wobbly and couldn't be fixed), and I painted the Robert Frost quote on it using a large engineering print from Staples and transfer paper.  I used the same method that I did for the Mailbox Makeover and DIY Canvas Art.  Then I distressed the writing a bit with sandpaper and waxed the whole thing with a dark furniture wax.  I am super happy with it.  And in case you're worried about baby, we hung it on the wall with two hangers, each rated for 50 lbs.  Special order at the hardware store for this worried first-time Mom :) 
"Imagine" Sign:  This was a gift a few years back from another dear friend.  The company covers letters with recycled metal containers.  Crazy fun.  I don't know where my friend got it, sorry.
God Gave Us You Book:  A sweet little gift from my parents. 

The pictures I took myself and other little knick-knacks I had on hand from random places.  
If you have questions about anything else, just let me know.

So there you have it!  The Nursery is finished and just waiting for a perfect little bundle to arrive!

We're all packed (well, as packed as we can get at this point) for the hospital, and waiting impatiently for the time to come.  But the baby will come in God's time, we know.  

We're hoping & praying for you, Little One,  
and we can't wait to meet you!


~The Doodle Bug


I'm usually partyin' at these hangouts:

Friday Feature @ Redoux
Feathered Nest Friday @ French Country Cottage
Furniture Feature Friday @ Miss Mustard Seed
Show & Tell Friday @ My Romantic Home
Flaunt it Friday @ Chic on a Shoestring Decorating
Frugal Friday @ The Shabby Nest
Simply Creations Link Party @ Simple Home. Life
It's a Hodgepodge Friday @ It's a Hodgepodge Life
Spotlight Saturday @ Classy Clutter
Trash 2 Treasure Tuesday @ Kammy's Korner

Friday, November 16, 2012

Kitchen & Dining Room Reveal

Chocolate?
Does anyone have some chocolate they want to give me?
No?

I see how good our friendship is.

But I guess even though you won't give me your chocolate, I can still show you our KITCHEN!
And our DINING ROOM!

**Edit:  The day I wrote this post, we had friends coming over for dinner.  She brought me chocolate.  She gets a gold star every day of her life :)

Yes, the time has finally come when you get to see a whole entire room of our house.  The living room is nearly done, but you have to wait for that until after I get a sofa reupholstered.
 Let's just say it's a bit of an "elephant" in the room.

Here are some before and after shots, and I'll give you a rundown of some specific things along the way.
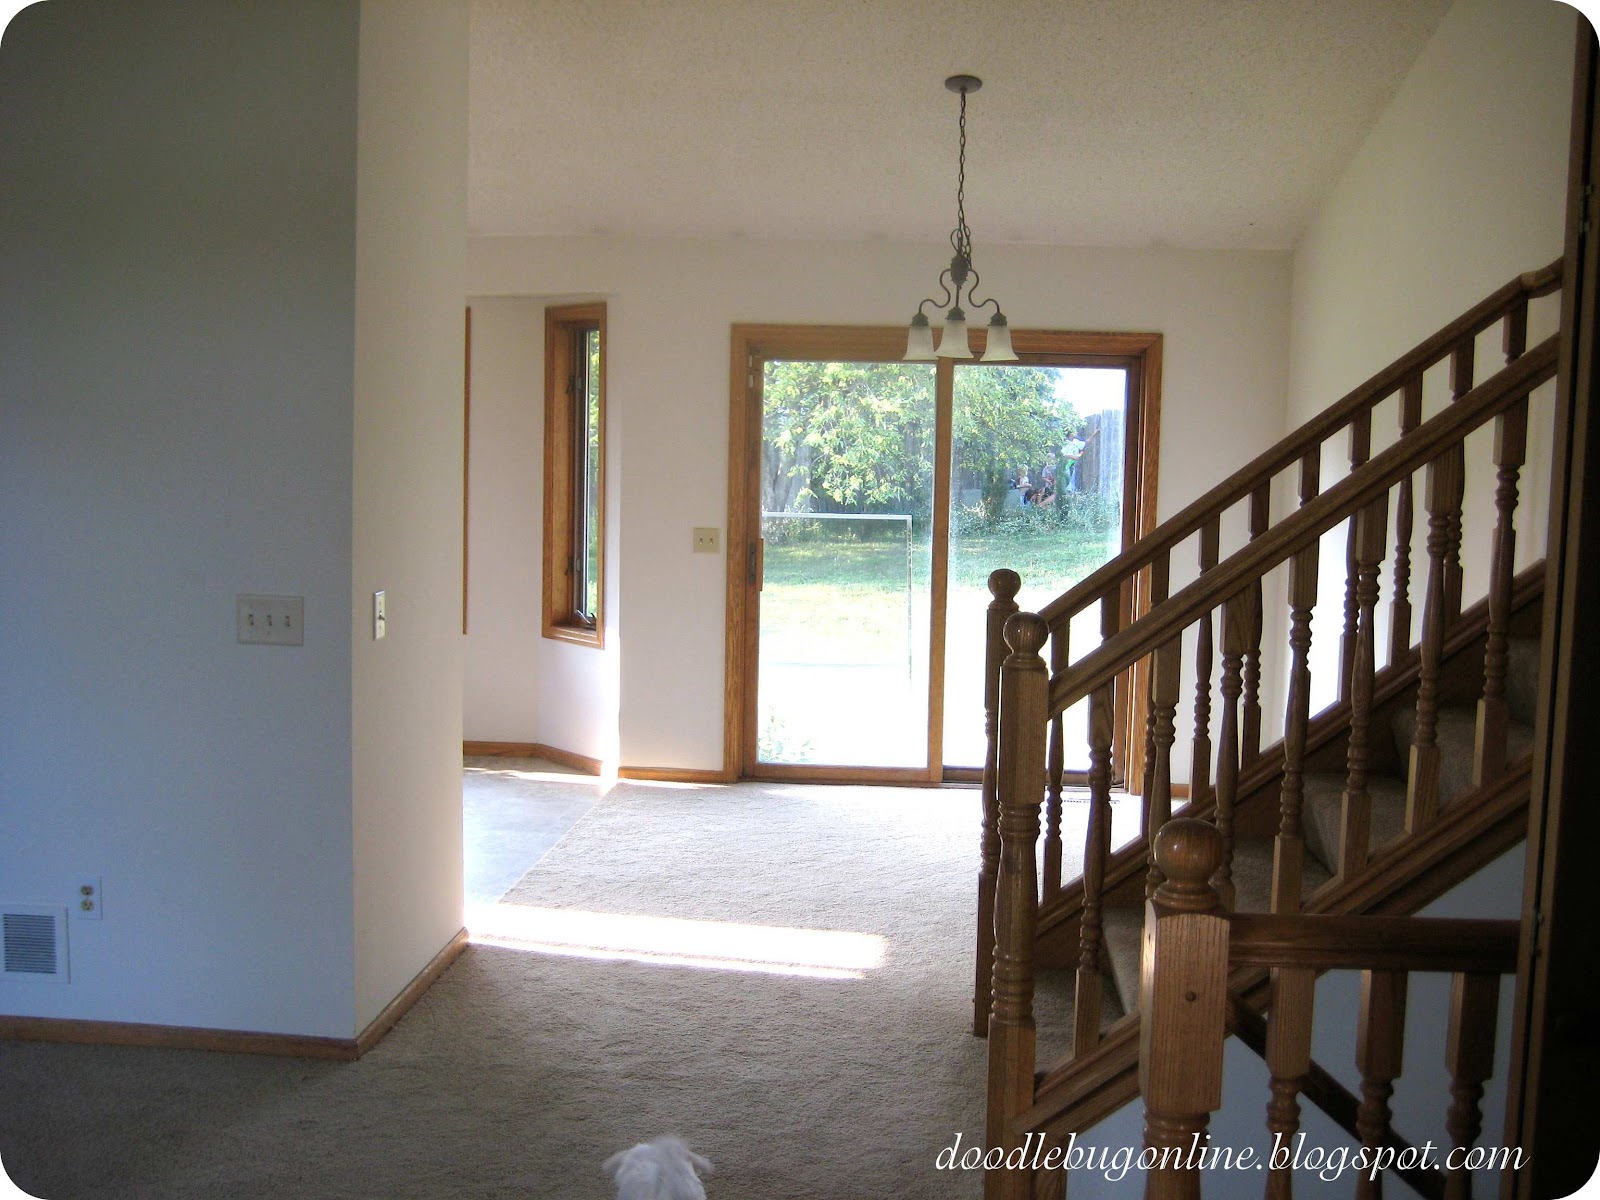
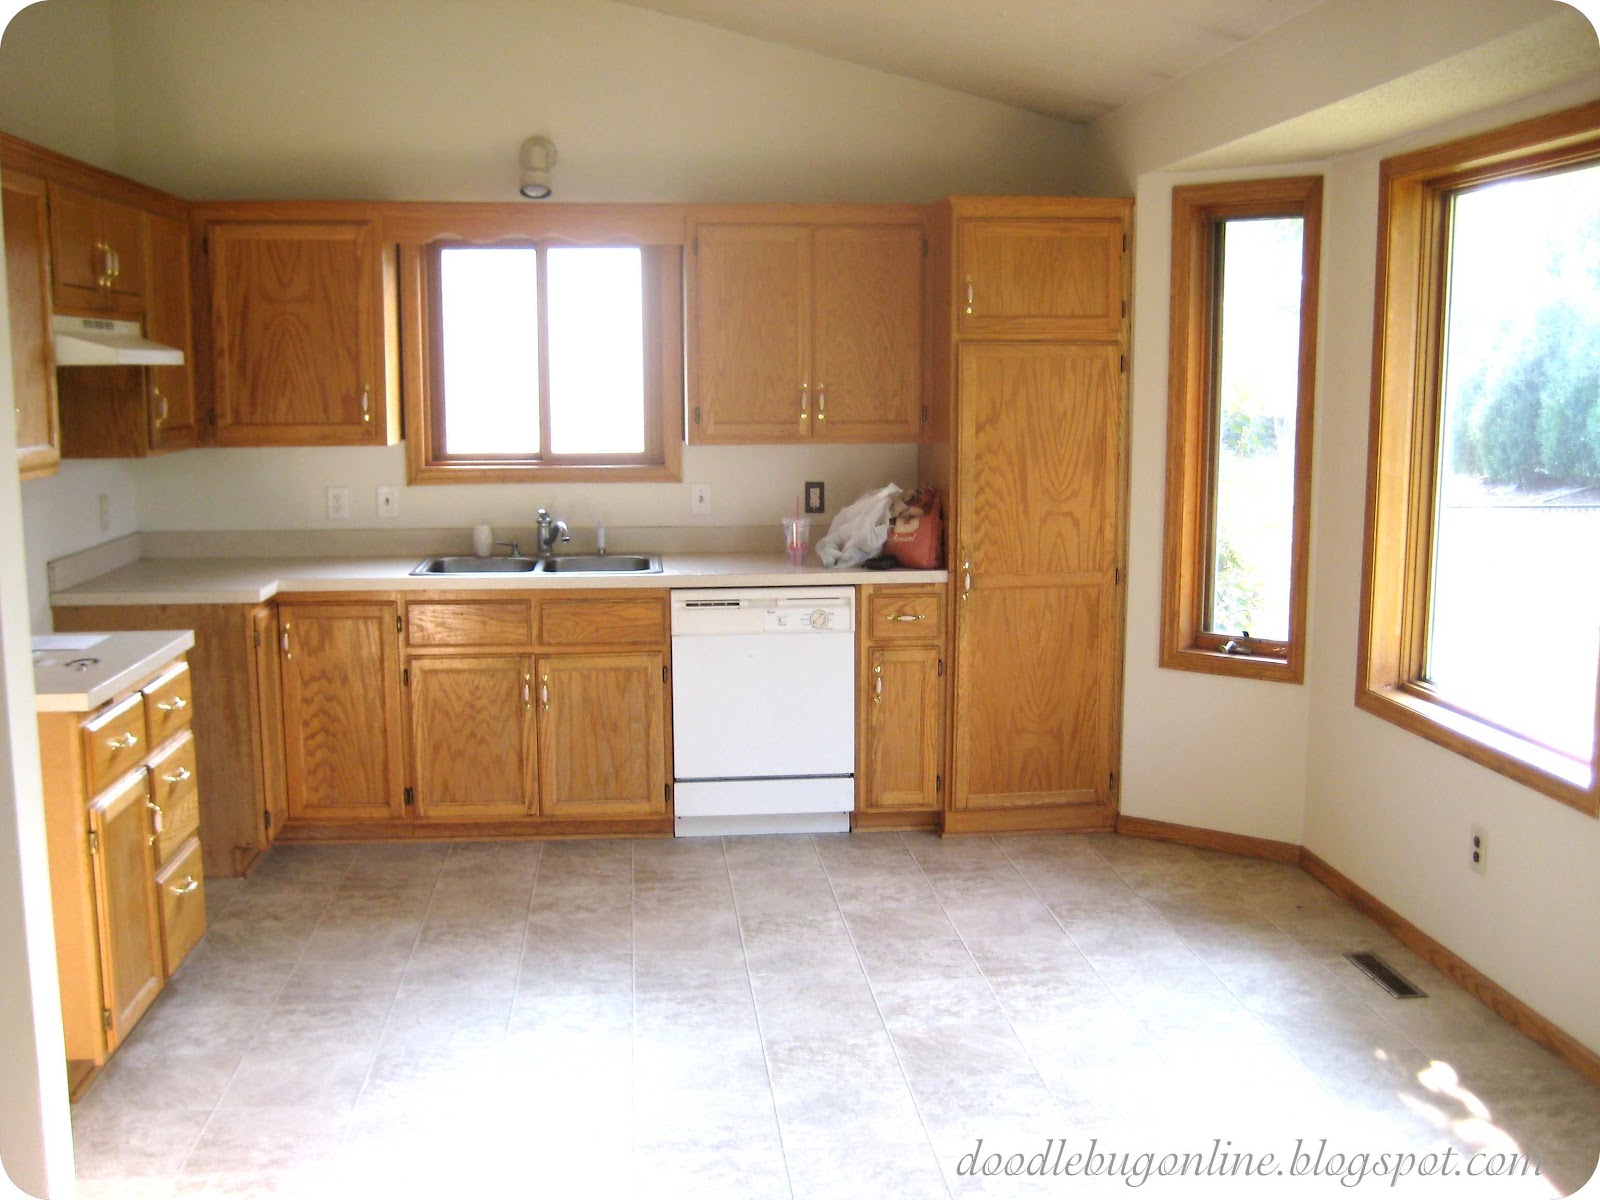
 The "before" pictures are from the day of our house inspection, while we were trying, trying to buy this house from a somewhat hesitant realtor/bank.
What?
Yeah.
First picture is what you first see while walking into the house.   Overall, things were in decent shape.  Just dirty.  And Oaky.  Is "Oaky" a real descriptor?
Here's what it looks like today.
We actually have had this chandelier for over 2 years.  We were once looking for a house in Iowa, and I found this nice chandelier at a garage sale for $15.  I thought "Oh, we'll be able to use that soon!"
Well, after two years of storing and hauling this thing around, it has finally found a home.  And the scale of this one is much better than the little baby that was there before.
Next is a view from the top of the stairs that you saw on the right of the last picture
Awww, even Jip looks cuter in the after shot :)
And do you see our new sliding door?  Much better!  The old one had a pane of glass broken out of it, so it had terrible insulation.  And the weatherstripping and wood had been all gnawed up, too.  Again, we say "thank you" to our good buddy...I'll call him the "Old Man" because he'll appreciate that...for helping Joe install it a couple Saturdays ago.

Also from the top of the stairs, here's a view into the kitchen 
* Please ignore the pile of dishes on the counter.  They're clean, I promise*
And here you can also see the Striped Bench...that mysteriously never made it into the shop to be sold. Strange thing, that is.
This is the kitchen, as seen from the dining room.
Gettin' the hang of the layout?  Good.
Because if you break into my house, I would hate for you to get lost.
Seriously, don't break into my house.
Here you can see the Kitchen Island, built by my handsome hubby.  Click on the link if you'd like to see some detail shots.
Also, check out my super-duper roller shade in the window above the sink!  I just made it about two weeks ago, and I'm pretty stoked about it (do people still say "stoked"?  Now that I typed it out again, it looks stupid).  
Slick, huh?  If you want to make one of your very own, it's not difficult.  I followed the tutorial from Design*Sponge found here.  The only part that they didn't explain was how to shorten the roller blind to fit your window.  I found those instructions here.  And if you're like me and you found a fabric you love...but it's lightweight, not medium like they suggest, you can do what the cool people do and iron on some heavy-duty interfacing.  Hooray!
Lest you think that all we did was paint the walls and trim and windows...and that led to so much more light bouncing around, I would like to direct your attention up.  To the ceiling.
EWWWWWW!!! Do you see that nasty ceiling?  EWWWW!
I think I almost had a conniption fit when Joe starting putting up the new ceiling paint.
And now that our ceiling is "bright white," it bounces the light around like crazy.  Which means we don't use lights during the day very often, and we only need to use a few at night.  I love that.
That plus the light wall color and white trim, and the house feels much more fresh.
 My amaryllis is almost done blooming.  So much for waiting for Thanksgiving, huh?  It's been really beautiful this year, though.  5 blooms in total, can't complain about that.
So there's our kitchen and dining room!
I'm still not sure if we're going to put something on the dining room wall.  And what it might be.
And I don't know if I'm going to end up putting something above the cabinets in the kitchen.
Perhaps I need to start collecting plates...
Or grapevines.
I hear those are all the rage.

Sorry, I'm getting snarky.
Probably because you wouldn't share your chocolate.

I'm off to go make bread and a mess in the kitchen now, though.  Good thing I cleaned it for these pictures!

If I don't get a post written next week, have a wonderful Thanksgiving!  I have a lot to be thankful for this year.  A gracious God, wonderful husband, perfect little baby to meet, loving family and friends, a new home, a puppy, and the list goes on...and on.


I hope you are able to spend your Thanksgiving surrounded by people you are thankful for.


~The Doodle Bug


I'm usually partyin' at these hangouts:

Friday Feature @ Redoux
Feathered Nest Friday @ French Country Cottage
Furniture Feature Friday @ Miss Mustard Seed
Show & Tell Friday @ My Romantic Home
Flaunt it Friday @ Chic on a Shoestring Decorating
Frugal Friday @ The Shabby Nest
Simply Creations Link Party @ Simple Home. Life
It's a Hodgepodge Friday @ It's a Hodgepodge Life
Spotlight Saturday @ Classy Clutter
Trash 2 Treasure Tuesday @ Kammy's Korner


Friday, October 12, 2012

Paint Mixing Basics

Paint Basics.
This is a post that's been waiting in the wings of my scattered brain, but it's finally here!
The world of paint is confusing if you don't know the basics behind all the terms.  When painting a house or a room in your house, it's fairly simple.  You buy wall paint, get it mixed to the color you want, and paint!

But what about those small projects you have around the house?
A dresser.
A sign.
A small wooden box.

Is it really necessary to go to the hardware store and get something mixed?
And what do you do with all those leftover half-cans of paint?

Well, I am here to tell you that mixing your own paint is not quite as scary as it may seem.
This post will go over:

1.  Basic elements of paints
2.  Paint Sheens
3.  How to mix your own custom colors

So put your thinkin' hat on and buckle up!!
3 Elements of Paint

There are three basic components to all kinds of paint:
1.  Pigment.
2.  Binder.
3.  Solvent, or vehicle.

The pigment is essentially the color component.  Think of it as food coloring--it has color, but serves no other purpose.  In paint, the pigment is generally a powder.  When you go to the hardware store and get some paint mixed, it is  pigment mixed with solvent that they add to get you your color.

Binder is essentially the glue that holds paint together...and holds your paint to the wall!  If you rubbed some pigment on your wall without adding a binder, it would simply rub off.  Binder keeps our paint where we put it.  I like binder :)

The Solvent, or vehicle of paint is simply what you put the binder and pigment into.  Binder plus pigment alone would be very pasty and difficult to apply, so paints either use water or oil to dissolve the pigment and binder, forming a nice paint that goes on smoothly.  The solvent then evaporates as the paint dries, leaving you with a nice thin layer of pigment and binder.
Pigment and binder in an oil solvent is an oil-based paint.
Pigment and binder in a water solvent is a water-based paint, also called "acrylic" or "Latex."  This is your basic house paint and what I use for most of my projects.

Now WHY in the world is this helpful?
Because oil and water DO NOT MIX!

If you're mixing your own paint, you MUST use either all water-based products, or all oil-based products.  You'll pretty much know right away if you try to mix oil-based and latex paint...it'll just give you a goopy mess!  If you're unsure if a product you have is oil or water-based, just take a peek at the label and it will tell you.
If it's one of those goofy cans that doesn't really say what the solvent is, check out the "clean up" instructions.  If it says to clean up with soap and water, it's water-based.  If it says to clean up with paint thinner or mineral spirits, it's oil-based.

**PRECAUTION:  Different products require different levels of protection when used.  Oil-based products should be used only with solvent-resistent gloves, good ventilation, and breathing protection.  Most **though not all** water-based paints are low-VOC anymore and can be used without much protection.  Though I still use gloves to keep my hands from drying out.

And you can just follow your nose most of the time--oil-based products are stinky :)

Paint Sheen
The sheen of a paint affects two things:
1.  The appearance of the paint
2.  The hardness of the paint.

The basic sheen levels are:
Flat/Matte
Eggshell
Satin
Semi-Gloss
Gloss/High Gloss

Flat or Matte paint has no gloss to it at all.  It does not shine, no matter how much light you throw at it.  The other end of the spectrum is Gloss (sometimes called High Gloss), which might blind you if too much light is shining off of it!

The important thing to keep in mind when deciding the sheen you want is the wear and tear of what you're painting.  If you're painting a sign for the wall, it doesn't really matter what you use because it's never going to be touched.  In that case, choose whatever you want.  If you're painting a table top that gets a lot of wear, a semi-gloss or gloss is going to hold up much better.

When Joe and I bought our house, it had flat white paint on every wall.  Nice to paint over, but it's almost impossible to wash.  The paint does not have any protective sheen to it, so when it gets nicked or dirty...it stays nicked or dirty.  

When mixing paint, it's important to understand sheen so that you can mix a paint that will hold up for you long-term.  Sheen is created by a very simple process, which you can think of this way:

All paint begins as high-gloss.
That means that when light hits it, it reflects straight back at our eyes.  Our eyes read this as "shine."
To knock down the sheen, the paint manufacturer adds tiny shards of a solid material into the paint.
These shards deflect the light in many different directions, so our eyes don't receive as much direct light back.  Our eyes read this as "less shiny" than when the shards were not there.
The more shards added, the lower the sheen and the weaker the finish.
That means that high-gloss paint has no shards, and flat paint has many shards added.  

All that to say two things:
1.  It is very important to stir your paint, because the shards can settle out onto the bottom of your paint can.  If this happens and you paint with it, by the time you get to the bottom of the can you will have a very different sheen of paint from when you started!  No problem, Timmy can live with the Ombre-sheen look on his furniture, right?  Well, maybe Timmy can, but it's no fun when you have end tables that are supposed to match, but one is gloss and the other flat!

2.  When you mix different paints, keep in mind that any non-gloss paint you add will also add shards to deflect light.  If you want to end up with a gloss finish, you must only use gloss products.  If you want to land somewhere around a satin finish, you can use some flat, as long as you counteract it with some gloss or semi-gloss.  

So what do you do if you have the perfect color, but it's the wrong sheen?  That happened to me with this Mid-Century Sideboard.
I didn't want to go buy different paint, because I already had plenty of the correct white on hand.  And I'm cheap.  But it was flat.  And I needed Satin.  What to do?
Well, let's review our three elements of paint:  Pigment, Binder, Solvent.
When I have flat paint but want satin, it means I have paint with the proper pigment, but there are more shards in it than I want.  How do I change the ratio of paint to shards without messing with the pigment?

Did you know that polyurethane is basically binder and solvent, without any pigment?
(I'm simplifying, here.  Paint scientists, don't get your panties in a bind)

So if I am using water-based paint...and mix in some high-gloss water-based polyurethane, will that not beef up my ratio of paint-to-shards?  Yes, it will.
So that's what I did to increase the sheen of my paint.  
You might be saying "Wait, it also gives you a higher ratio of solvent-to-pigment" and you would again be right.  You have to be careful about adding too much, because it will thin out the pigment and give you less coverage.  

I solved that by doing a coat of the flat white paint, then a coat of the polyurethane + paint.  This gave me the sheen I wanted on the top coat (since the top coat is the only one that really effects the sheen), without sacrificing my color.

*Note:  You can also just put a topcoat of straight polyurethane over your flat paint to get the sheen you want. The reason I didn't is because when I put polyurethane over white paint, it tends to yellow the color a bit.  Mixing it in with the white paint solved that issue).

Color Mixing
What do you do when you have the perfect paint chip...but only need about a cup of paint?  
Or when you've already bought 5 samples from the store and none of them are quite right?
Or you have a zillion little jars of paint and just need to mix another color from them?

You mix your own!!

I've mixed a lot of my own paint over the past few years, and in fact until we bought our house I never had a custom color mixed at the store.  It takes some practice, but it can be done and done well.  
And then you save money, because you're using the paint you already have on hand! 
That is a wonderful thing.

In order to successfully mix your own paint, you need to have a few things:

1.  Black paint
2.  White Paint
3.  Red paint
4.  Blue Paint
5.  Yellow Paint.

Hmmm...the second grader in us all is saying to ourselves "wait a second...those are PRIMARY colors!"
And you would be right.  Gold star for the day.

You can mix any color using only primary colors and black and white.  
Yes, you can do a dance.  I am.

The exception to this rule is bright, neon-type colors.  Those you have to buy special.

Let's start with a basic understanding of color and the beloved color wheel.
(how is that second-grader in you holding up?)
Image Via Bloomers Blog
You know how this works.  The primary colors are red, yellow, blue.  When you mix any of those two together, you get a secondary color. 
Red + Yellow = Orange
Red + Blue = Purple (or violet) as they say here.
Yellow + Blue = Green

And the colors in-between are the tertiary colors, which essentially are secondary colors that lean more toward one primary or another ( green-yellow, or blue-purple).

Also, Complimentary Colors are the colors opposite each other on the wheel:
Blue : Orange
Yellow : Purple
Red : Green  (I'm a man, and I can change...)

I am going to go ahead an assume that if I gave you red paint and blue paint, you could mix me up a purple that would blow my mind.  
That said, what if you wanted a lighter purple?  You would mix white in with it!
If you wanted a grey-purple?  Mix in some black!
What if I wanted more of a Mauve?  
Uh....
That's when our second-grade art teachers stopped teaching us.

And then all-of-a-sudden we're in a scary color desert surrounded by mauve and seafoam and burnt orange, without a clue of how to get out!  We mix and mix and end up with ugly grey versions of terrifying browns and dull lifeless colors.  Help!!

But then the color fairy comes and saves us with a few simple tips.  Ahhhh...thank you, color fairy.


Color Fairy Tips:

1.  If you need a color that's just slightly "duller" or "browner" than the regular version (e.g burnt orange or mustard yellow), mix up a color that's close and then  ADD ITS COMPLIMENTARY COLOR.
This will change. your. life.
I used to think that adding a little black would get me everywhere I needed to be.  I was wrong.  Black will only make it more grey.  Point Taken.

2.  Know the difference between "Warm" and "Cool" colors.  
The basic rule is that yellow and red are warm colors, whereas blue and green are cool colors.  This is generally true, but it gets confusing when high falutin' designers talk about a "warm grey" and "cool yellow."  Say WHAT?  All they mean to say is that the grey (which is usually a cool color) has some warm color added in.  It may have more yellow or red in it, which gives it a warmer glow than if it had a lot of blue in it.
Knowing whether you're trying to mix a warm or cool color will give you an idea of what you need to add.  Does the yellow you're trying to mix lean more toward orange?  You may need a little red as you mix.  Does it lean more toward green?  You'll need to add a bit of blue.

3.  Start with a small container.
Need a gallon of aquamarine paint?  DO NOT GRAB A GALLON OF WHITE AND START MIXING INTO IT!!  Start with a little container and try mixing a small bit first.  If you can successfully mix a small amount, you'll know how to mix a larger amount.  It can be surprising how much or how little white paint you actually need to make your color.  And you don't want to end up with five gallons of aquamarine paint, do you?

Mixing colors is not a science...well, it's not when you're at home using leftover paint and craft paints.  It is a bit of an art...just start small and add until you have it right.

4.  When you're pretty sure you have the right mixture, make sure to test it and see how it dries :)
Paint will generally dry darker than you think...well, mine does.  So double check its dry color against what you want.

Does all of that make sense?  Feel free to ask questions to clarify.  And sometimes when a color is being stubborn, it makes me want to pull my hair out.  But with the right knowledge, anyone can mix their own paint and get the perfect color off of their paint chip and onto their project...
Image Via Design Seeds

...hopefully without entering the scary color desert.

Congratulations, you finished this post.
You are now a paint master.

Happy mixing :)


~ The Doodle Bug


I'm usually partyin' at these hangouts:

Friday Feature @ Redoux
Feathered Nest Friday @ French Country Cottage
Furniture Feature Friday @ Miss Mustard Seed
Show & Tell Friday @ My Romantic Home
Flaunt it Friday @ Chic on a Shoestring Decorating
Frugal Friday @ The Shabby Nest
Simply Creations Link Party @ Simple Home. Life
It's a Hodgepodge Friday @ It's a Hodgepodge Life
Spotlight Saturday @ Classy Clutter
Trash 2 Treasure Tuesday @ Kammy's Korner